Building a JavaScript guitar pedalboard
Posted on in WebI’ve just launched a new side project in the form of a JavaScript guitar pedalboard. It’s a handy crossover of my coding and guitaring hobbies.
Try the pedalboard out for yourself!The original intention for the project was to build a delay pedal, but after a Wednesday evening of hackery, I had a working prototype with mix, speed, feedback and tone controls. My mind started to wander, and before long, I had visions of a whole pedalboard!
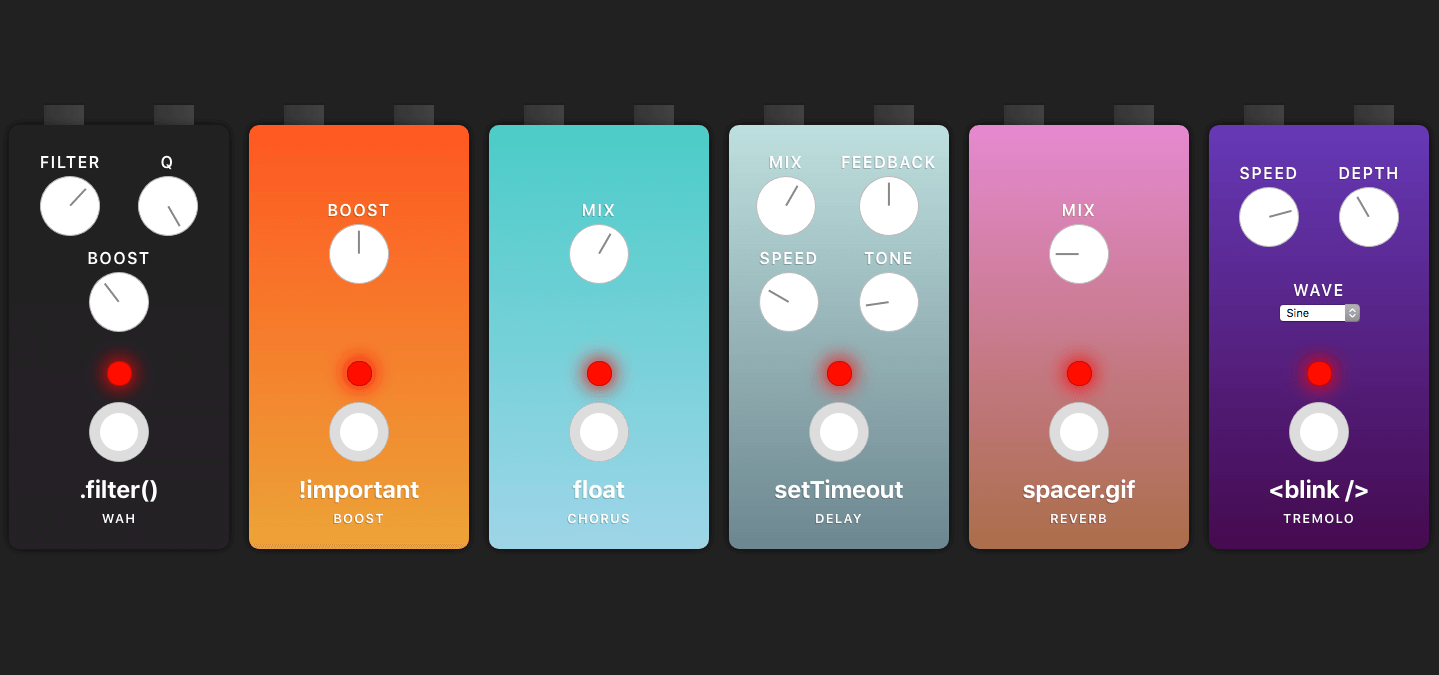
Each pedal had to have a fun code-y name. For some, it was definitely a case of pun-driven development, where the name decided which pedal to build next. Here’s what I came up with:
- Delay:
setTimeout - Tremolo:
<blink /> - Chorus:
float - Boost:
!important - Reverb:
spacer.gif - Wah Wah:
.filter()
UPDATE
Since this writing post, I’ve also added a Smoosh compressor, Math.pow() overdrive and most excitingly, a for(loop) loop pedal! You can read about them here!
Delay
Delay was a fun starting point; the Web Audio API has a DelayNode that takes a stream and delays it be a specified number of seconds. This delays the whole signal, which isn’t ideal for a pedal. None of the nodes include a ‘mix’ control, so you have to built it yourself.
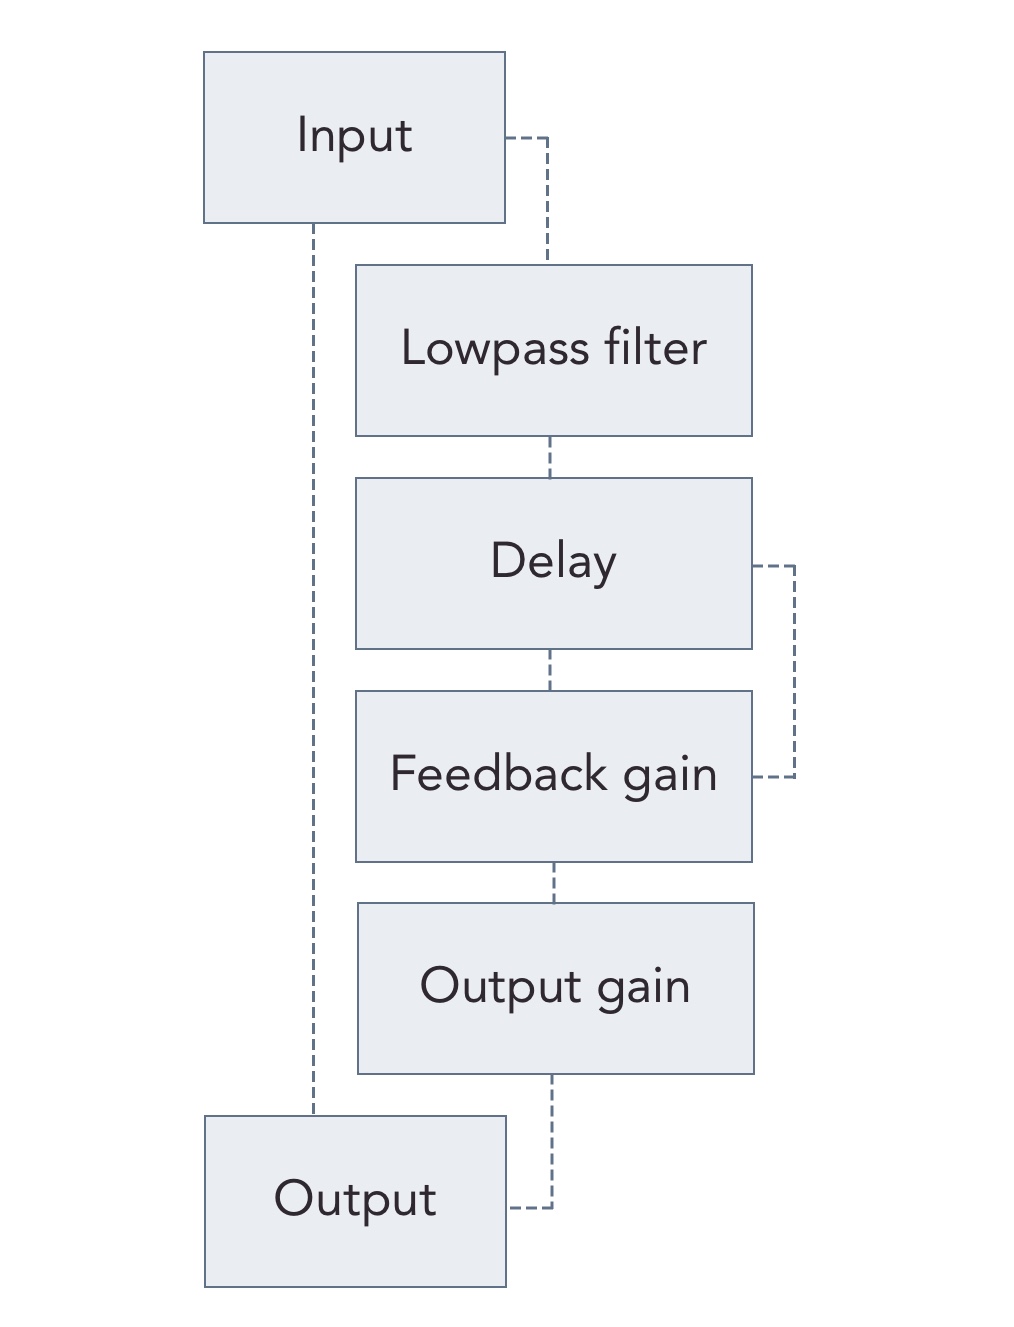
The trick is to split the signal, sending one part straight to the output and the other to into the delay section, starting with a Biquad Filter. This filter is the tone control for the delay repeats, giving the impression of a darker analogue delay, or a crisper digital sound.
Next it heads to the delay node, which does what is says on the tin. Not only does it lack a mix control, it doesn’t let you specify the number of repeats. I began thinking about how to tackle it, perhaps with multiple delay nodes. But then I remembered what the ‘number of repeats’ is usually called: Feedback! That means connecting the stream back into itself, or in other words: audio recursion!
The first step is to split the signal again, sending one part to an output GainNode (acting as a mix control), and the other to a feedback GainNode, reducing the volume. This is how we get multiple, controllable repeats of lowering volume. Without the feedback gain stage, the delay would get into a proper feedback loop, creating some crazy sounds.
Then we send it back into the same delay node as before, where it joins the stream and loops back around the nodes. It becomes quieter each loop till it fades out completely.
Here’s a diagram of the pedal:
And here’s the code:
const filter = ctx.createBiquadFilter();
const delay = ctx.createDelay(defaults.maxDelay);
const feedback = ctx.createGain();
const delayGain = ctx.createGain();
const output = ctx.createGain();

input.connect(output);
input.connect(filter);
filter.connect(delay);
delay.connect(feedback);
feedback.connect(delay);
feedback.connect(delayGain);
delayGain.connect(output);
It’s all very “leg bone’s connected to the knee bone”, which I absolutely love. It’s a brilliantly designed API; very practical, intuitive, and extensive. The MDN docs are also fantastic.
Tremolo
Tremolo was the next candidate. It uses the OscillatorNode to modulate the amplitude (volume/gain) of the input signal. The most challenging part was the depth control. Again, the solution was to split the signal in two, and control the dry/wet signals in inverse quantities. The dry path stayed unaltered, whereas the wet path had the modulated gain node attached. As you mix more wet signal in, you reduce the amount of dry. This creates a less intense sound without increasing the overall volume.
Chorus
Chorus was tricky, and to be honest it’s the one I’m least happy with. Dan from That Pedal Show brilliantly explained the concept of Chorus/Flanging, but I really struggled to emulate it. Modulating the delay time never quite got the right sound, and I ended up using requestAnimationFrame as the OscillatorNode was too aggressive. This is definitely one to refactor and prototype a little more; it could be a great effect and would tick off flanging too.
Boost
Boost was nice and simple, a single gain node, nothing more. Lovely stuff.
Reverb
Reverb was so cool! It uses the ConvolverNode which samples another audio source (referred to as an impulse) and works out the ‘shape’ of the original sound, making it reproducible. Some kind chap has created a whole host of free impulses to use; I opted for the ‘Conic Long Echo Hall’ to get a nice large reverb. Wiring it up was surprisingly straightforward for what seems likes a complex effect:
const reverb = ctx.createConvolver();
await fetch('/assets/Conic Long Echo Hall.wav')
  .then(response => response.arrayBuffer())
  .then(data => {
    return ctx.decodeAudioData(data, buffer => {
      reverb.buffer = buffer;
    });
  });
The final piece of the puzzle was a mix control, created in the same way as the tremolo depth control. I was particularly proud of the name spacer.gif too!
Reverb and delay tails
One particularly challenging feature was Reverb and Delay tails. Tails allow the sound to ‘tail off’ when you switch the effect pedal off. I was really struggling to work out how to route the audio without rewriting considerable chunks of code. After two failed attempts, I turned to pen and paper, sketching out the audio nodes. As it often tends to go, the solution came to me quickly. There’s something enlightening about using paper to solve virtual problems, I find my brain engages differently to that medium.
The solution was to split the signal into wet/dry, and expose an FX send and return from the input switch code. The FX return stays connected to the live output at all times, even when the pedal is off (which seems counter-intuitive at first). But with that in place, we can toggle the input source from wet to dry, and leave the output to provide tails!
const [
  fxSend,
  fxReturn,
  output,
  toggle
] = createInputSwitchWithTails(
  input,
  isActive
);
Wah Wah
Tim suggested a Wah pedal after I filled him in on the project. I’m pretty happy with the outcome, but it’s definitely not as pronounced an effect as I would like. It uses the BiquadFilterNode in bandpass mode. There’s an aggressive Q, and maximum attenuation, but it still sounds quite subtle. I started off with an ‘autowah’ approach, using another requestAnimationFrame loop, but nothing beats hooking up a real expression pedal… 🥁
Web MIDI API
This is an equally lovely web API. I’m using it with very light touches, but it’s still a very powerful way to get tactile and tangible hardware interacting with your website. Connecting to MIDI devices is a nice one-liner promise, returning an array of inputs and outputs. You then loop through the inputs and attach our event listener.
try {
  const midiCtx = await navigator.requestMIDIAccess();

  midiCtx.inputs.forEach(entry => {
    entry.onmidimessage = onMidiMessage;
  });
} catch (e) {
  console.log('No midi connectivity');
}
The handler is pretty low key too. I opted to listen for the two appropriate codes; 144 and 176, and dispatch custom events onto the window.
const onMidiMessage = ({ data }) => {
  if (data[0] === 144) {
    window.dispatchEvent(new CustomEvent('MIDI', {
      detail: data[1]
    }));
  }

  if (data[0] === 176) {
    window.dispatchEvent(new CustomEvent('MIDIEXP', {
      detail: data[2]
    }));
  }
};
144 is the ‘Note On’ message. I use the wonderful Looptimus controller, that sends out digits corresponding to which pedal has been pressed, which in turn can be used to turn the JS pedals on and off!
window.addEventListener('MIDI', ({ detail }) => {
  if (detail === pedalIndex) {
    togglePedal();
  }
});
176 is the ‘Control change’ event which fires every time the expression pedal is moved. It runs from 0 to 127, so we can invlerp, then lerp to squash and stretch the values from one data size to another.
window.addEventListener('MIDIEXP', ({ detail }) => {
  const decimal = invlerp(0, 127, detail);
  const value = lerp(filterMin, filterMax, decimal);
  filter.frequency.value = value;
});
This ‘hands-off’ approach with events also keeps the rotary knobs working without MIDI, adding control as some form of progressive enhancement.
Closures and currying
I found currying to be a particularly helpful technique for this project. In simple terms, a currying function is one that returns another function, but that’s not really doing it justice, so it’s worth reading up on it. Here’s one in action:
const myFunction = (a) => {
  console.log(a);
  return (b) => {
    console.log(a, b);
  }
}
This can be called in a slightly confusing manner:
myFunction(1)(2);
// 1
// 1 2
But it can also be written in a much more readable way:
const result = myFunction(1);
// 1
result(2);
// 1 2
When you call the first function with some parameters, you ‘inject’ that function with some state that can be used later. I like to think of them as ‘code grenades’. That first call primes the function, pulling out the grenade’s safety pin, and the second call sets it off!
Let’s take a function for updating an AudioNode or ‘pot’ (potentiometer). It takes a pot parameter and returns another function expecting a browser event:
const updateNode = pot => {
  return event => {
    pot.value = event.target.value;
  };
};
We can use it in several ways:
// Not overly readable
input.addEventListener('input', event => {
  updateNode(feedback.gain)(event);
});

// Getting better
const potToUpdate = updateNode(feedback.gain);
input.addEventListener('input', event => {
  potToUpdate(event);
});

// So SUCCINCT
const onInput = updateNode(feedback.gain);
input.addEventListener('input', onInput);
This means we can move the updateNode(feedback.gain) call into another function that has access the AudioNode in question, and just pass around onInput as a generic event handler. It’s a neat way to keep concerns separate, and reduce the mixing of DOM and audio API code.
Creating the UI
There wasn’t really a conscious decision to write this in vanilla JS, it sort of just happened by extension of hacking and getting a bit carried away.
I did consider using Typescript (to improve IDE intellisense) or Preact (to control DOM elements), but opted it to keep it simple. There’s an interesting side effect to using the Web Audio API. Each node holds it’s own state, but crucially doesn’t emit events like the HTMLMediaElement.
It’s one of the reasons I love the <video> and <audio> elements so much. They hold play, time, duration and speed state, but also emit sensible events when any value updates. It means you can separate the trigger from the event. Take a play/pause button that changes it’s icon depending on the video state. You could change the icon on the click event, but that’ll get out of sync if there are two buttons, or the user clicks directly on the video. The key is to only call video.play() from the trigger, and change the icon(s) on the play and pause events. Sorry, this has gone a bit rambly. The point was, AudioNodes don’t have such events, so state effectively has to be managed twice.
Making a pedal
A pedal is composed in a number of steps:
- Create the audio nodes
- Create the on/off switch, including the output gain stage
- Set the default node values
- Connect the audio nodes together
- Create the pedal DOM structure
- Create and wire up each rotary knob
It’s not the most concise setup, but it works. Here’s the full code for the boost pedal:
const boostPedal = function(input, index) {
  // Default settings
  const defaults = {
    gain: 1.5,
    active: false
  };

  // Create audio nodes
  const sum = ctx.createGain();
  const boost = ctx.createGain();

  const [output, toggle] = createInputSwitch(input, sum, defaults.active);

  // Set default values
  boost.gain.value = defaults.gain;

  // Connect the nodes togther
  input.connect(boost);
  boost.connect(sum);

  // Create the DOM nodes
  const pedal = createPedal({
    name: 'boost',
    label: '!important',
    toggle,
    active: defaults.active,
    index
  });

  createRotaryKnob({
    pedal,
    name: 'boost',
    label: 'Boost',
    max: 3,
    onInput: updatePot(boost.gain),
    value: defaults.gain
  });

  $pedalboard.appendChild(pedal);

  return output;
};
Input choice
One neat browser feature I leaned on was the [type="range"] input - it’s powering every rotary knob. You pass it a min, max, and step and it creates a nice draggable slider. The only downside is that it doesn’t look like a rotary knob. Regardless, it still has merit, both from an accessibility standpoint, and as a great way to cap min and max values. A range input will only accept values that meet the min, max and step criteria, which makes it perfect to accept values generated by the dragged rotary knob, and ensure no dodgy values get through to the Web Audio API nodes.
Summing up and future plans
I’m very happy with how this three day hack has come together. It was a magical feeling the plug my guitar into the browser for the first time. It felt so tangible, and so real to create a virtual thing interacting with a physical thing. And that feeling was mirrored when plugging the MIDI devices in. I’d definitely love to explore this space a bit more.
The chorus pedal doesn’t sound great, so that should be the next point of focus. I’d also like to get some animations onto the pedals, and maybe some live visualisations. A loop pedal would also be incredible. But who knows, I’m chuffed with the progress so far and any more will be a win.
Disclaimer, I’ve only really tested this in Chrome and Firefox, plus Web Audio API support is limited, so apologies for the other browsers out there 😐 - It’s also not hugely optimised for mobile yet!
The code is also visible on GitHub, and uses Sergey for compilation.
Try the pedalboard out!Footnotes
The MDN docs for Web Audio API are truly exceptional. Check them out!
Pedals.io looks like an incredible complete pedalboard setup, and considerably more refined than my efforts!
Posted on in Web